tp
User Guide
Introduction
PlanPal is a desktop application designed for international students studying in NUS. It functions as an all-in-one organizational tool, enabling users to manage contacts, track expenses, and schedule activities. The user interacts with the application using a CLI and is written in Java 17.
Purpose of User Guide
The purpose of this guide is to show you how to get started on using this PlanPal and to introduce you to the basics of using it. This includes getting to know the feature and syntax of the commands.
Target Audience
NUS International students who are frugal and organized. It caters to the needs of these NUS international students, allowing them to keep track of important contacts, activities, as well as manage their spending while in a foreign country.
Table of Contents
- Quick start
- Warnings
- Features
Quick Start
- Ensure that you have Java 17 or above installed.
- Down the latest version of
PlanPalfrom here. Find the latest release and downloadPlanPal.jar. Place the file in a folder of your choice. - Open the command terminal and navigate to the folder where
PlanPal.jaris downloaded. - Use the command
java -jar PlanPal.jarto launch PlanPal On start up, you should see the following screen:
/MainScreen.png)
- When you are finished using PlanPal, use the
byecommand to terminate the application. This will ensure that your data is stored correctly and is available for future access.
Warnings
Due to the nature of PlanPal as CLI-based application, please take care to avoid malformed commands to avoid undesirable performance of PlanPal. Some examples are shown below
Validity of phone number
Warning: PlanPal allows for phone numbers of any length to be entered
For example:
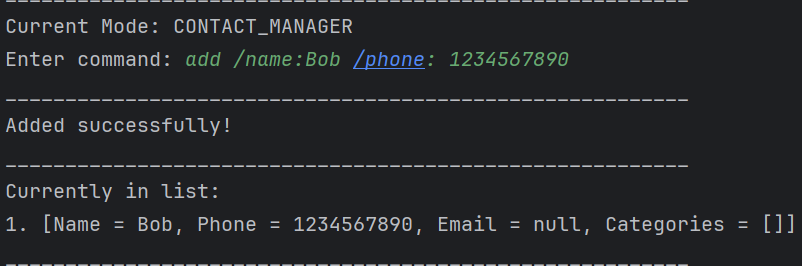
Example of how your phone number should look like. Since phone numbers outside of Singapore may not have the standard 8-digits, any length of phone number will be allowed, and it is up to the user to ensure the phone number is entered correctly.
Invalid inputs
Warning: Inputs in PlanPal should not contain any : or /. Due to the fact they are used in determining the category, using : or / in your inputs may lead to unsatisfactory results when using PlanPal.
For example:
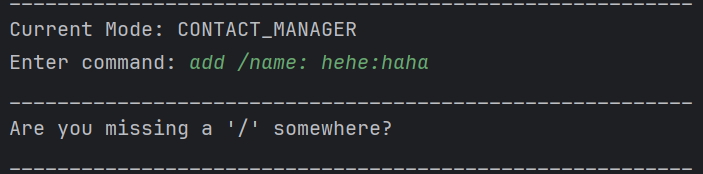
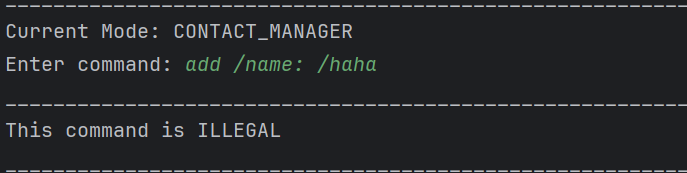
Example of invalid inputs. Since / and : is used in determining category, it detects that there is a second category within the name with a missing /. If there is a need to use a separator, please use any symbol other than / and :.
Features
This section will focus on some of the key features of PlanPal and explain their usage. We will go over several features, including the Contact, Expenses and Activity Manager functionalities.
Modes
Within PlanPal, there exists 3 modes, namely Contact Manager, Expense Manager, and Activity Manager.
- To select the
modeyou want to use, enter a number ranging from 1 to 3. In this example, to useContacts, enter 1 into the CLI.
/ModeScreen.png)
- Functionalities for each
modewill be expanded on below. - To exit any mode, use the
exitcommand.
Contact Manager
PlanPal will assist you in tracking the Contacts in your planner. The guide below will show you how to make use of the contact manager commands.
Adding a Contact
The add command allows users to add a Contact with one or more of these categories: name, phone, email, and category.
Usage:
add /name: <value 1> /phone: <value 2> /email: <value 3>
Remarks :
Category can only be edited using the category command.
There are no other tags other than name, phone, email and category in Contact Manager.
Email format : must consist of four parts
character : [a-zA-Z0-9_] i.e. letters (uppercase and lowercase), digits (0-9), and underscores (_).
1) username : begins with at least one word character, followed by more word characters or . or - or nothing (directly to part 2).
However, a . or - must follow by a word character. That is, the input string cannot begin with . or -; and cannot contain .., --, .- or -.. Example of valid string are a.1-2-3.
2) @.
3) email domain name : same rule as username (part 1).
4) matches a . followed by two or three word characters, e.g., .com, .edu, .us, .uk, .co.
Example 1:
add /name: johnny /phone:12345678 /email:johnny@gmail.com
Expected Output:
_________________________________________________________
Added successfully!
_________________________________________________________
Currently in list:
1. [Name = johnny, Phone = 12345678, Email = johnny@gmail.com, Categories = []]
_________________________________________________________
Example 2:
add /name: johnny
Expected Output:
_________________________________________________________
Added successfully!
_________________________________________________________
Currently in list:
1. [Name = johnny, Phone = null, Email = null, Categories = []]
_________________________________________________________
Viewing the Contact List
The list command allows users to view all their current Contacts.
Usage:
list
Expected Output:
_________________________________________________________
Below is the list:
1. [Name = johnny, Phone = 12345678, Email = johnny@gmail.com, Categories = []]
_________________________________________________________
Format:
_________________________________________________________
Below is the list:
1. [Name = <name>, Phone = <phone>, Email = <email>, Categories = [<category1>, ...]]
_________________________________________________________
Deleting a Contact
The delete command allows users to delete an existing Contact in the contact list.
Usage
delete <index>
Example
The user wants to delete an existing Contact that has an index of ‘2’ in the contact list.
delete 2
Expected Output:
_________________________________________________________
Deleted successfully!
_________________________________________________________
Currently in list:
1. [Name = johnny, Phone = 12345678, Email = johnny@gmail.com, Categories = []]
_________________________________________________________
Editing a Contact
The edit command allows users to edit a Contact from the list.
Usage:
edit <index> /<category 1>: <value 1> /<category 2>: <value 2>...
Example 1:
edit 1 /name: Cassie
Expected Output:
_________________________________________________________
Edited successfully!
_________________________________________________________
Currently in list:
1. [Name = Cassie, Phone = 12345678, Email = johnny@gmail.com, Categories = []]
_________________________________________________________
Finding a Contact
The find command allows users to find Contacts from the list. User can search of multiple words at a time and the
input is not case-sensitive.
Usage:
find <value>
Example 1:
find alice david
Expected Output:
_________________________________________________________
Here is what I found:
1. [Name = David, Phone = null, Email = null, Categories = []]
2. [Name = Alice, Phone = null, Email = null, Categories = []]
_________________________________________________________
Setting category
The category command allows users to enter setting category mode to customize category in contacts.
Stored category data will be loaded automatically once enter contact mode. Once there is categories data corruption, error and subsequent adding, editing statements will be shown. After that, categories.txt will restore data from the backup file (with no error) automatically to prevent error in the next loading of the program.
Usage:
category
Expected Output:
_________________________________________________________
Current Mode: setting category mode
_________________________________________________________
Remark : Inside setting category mode, any command other than those specified by the following 7 commands will result in
Expected Output:
_________________________________________________________
invalid command
_________________________________________________________
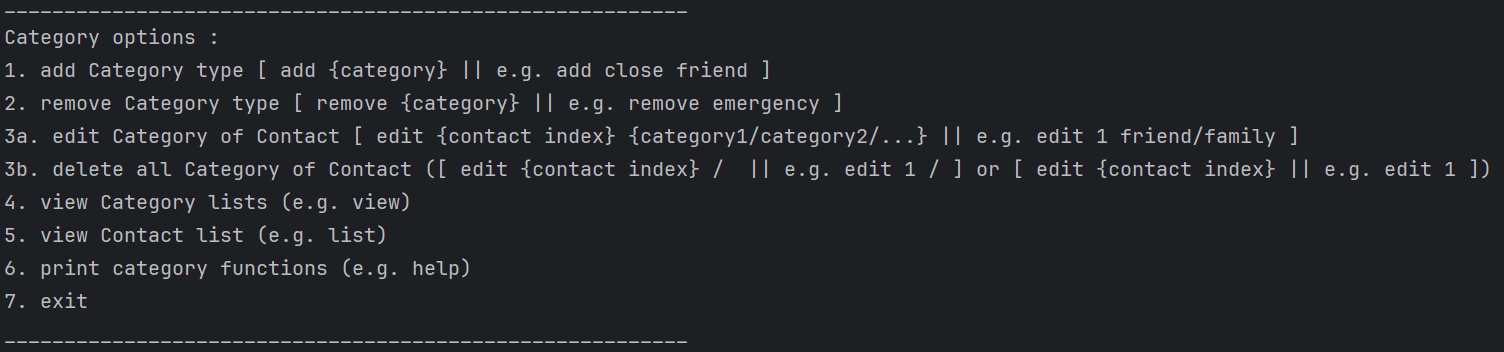
The following 7 commands are the available commands in setting category mode.
1. Add Category (inside setting category mode)
The add <category> command allows users to add category
that can be assigned to contact for efficient contacts searching by category.
Remark : This command only works in setting category mode.
add outside setting category mode can perform a completely different function
Example 1 (successfully added):
add friend
Expected output:
_________________________________________________________
successfully added Category : 'friend'
_________________________________________________________
Example 2 (“/” is included):
add /friend
Expected output:
_________________________________________________________
/ is not allowed to be used in category name
_________________________________________________________
Example 3 (empty description):
add
Expected output:
_________________________________________________________
Description cannot be empty!
_________________________________________________________
Example 3 (category already exists):
add
Expected output:
_________________________________________________________
Category already exists
_________________________________________________________
2. Remove Category
The remove <category> command allows users to remove category.
This command will automatically remove the original assignment of this category to all contacts
Remark : This command only works in setting category mode.
Example:
remove friend
Expected output if friend is not a category:
_________________________________________________________
friend is not a category
_________________________________________________________
Expected output if friend is a category:
_________________________________________________________
successfully deleted Category : 'friend'
_________________________________________________________
3. Edit Categories of Contact
The edit <contact index> <category1/category2/...> command allows users to assign
a category to contact and to delete the category assigned to contact.
Note:
- To add a category to a contact, the category needs to be added first (refer to here)
- All details in category will be replaced with the new category in this command, and only one category can be assigned to each contact.
Format
edit <contact index> <category1/category2/...>
Example 1:
edit 1 friend
Expected output for successfully edit:
_________________________________________________________
successfully assigned categories to Contact id : 1
_________________________________________________________
Expected output if friend is not a category:
_________________________________________________________
friend is not a valid category
_________________________________________________________
Note: If there is no category included in the command, the contact will be assigned with no category, i.e. remove all categories assigned to the contact. (See Example 2 below)
Example 2:
edit 1
or
edit 1 /
Expected output if contact id is valid:
_________________________________________________________
successfully assigned categories to Contact id : 1
_________________________________________________________
Example 3 (contact id is invalid):
edit 0 friend
Expected output:
_________________________________________________________
Invalid contact id
_________________________________________________________
Example 4 (contact id is empty):
edit
Expected output:
_________________________________________________________
Description cannot be empty!
_________________________________________________________
4. View Categories
The view command allows users to view all categories that are existing
and can be assigned to contacts.
Example:
view
Expected output:
_________________________________________________________
Below is the list:
1. friend
_________________________________________________________
5. View the Contact List
The list command allows users to view all their current Contacts.
Usage:
list
Expected Output:
_________________________________________________________
Below is the list:
1. [Name = johnny, Phone = 12345678, Email = johnny@gmail.com, Categories = []]
_________________________________________________________
Format:
_________________________________________________________
Below is the list:
1. [Name = <name>, Phone = <phone>, Email = <email>, Categories = [<category1>...]]
_________________________________________________________
6. Print Category Functions
This command will provide guide to functions in setting category mode.
Usage:
help
Expected Output:
 —
—
7. Exit Category
This command allows users to exit the setting category mode.
Example:
exit
Expected Output:
_________________________________________________________
exit category
_________________________________________________________
Search Contacts by Category
The search command allows users to search Contacts belonging to user-defined category.
Usage:
search <query>
Example 1:
search friend
Expected Output if category not defined:
Category not found.
_________________________________________________________
Expected Output if no contacts in category:
Contacts in category: friend
There is no contact in friend
_________________________________________________________
Expected Output if there exists contacts in category:
Contacts in category: friend
[Name = andy Phone = null Email = null]
_________________________________________________________
Expense Manager
PlanPal will assist you in tracking your Expenses in your planner. The guide below will show you how to make use of the expense manager commands.
Quick Guide
This section provides a quick tutorial on how to use expense manager.
As a start, ALWAYS follow this sequence to prevent errors:
- Set the budget using the
budgetcommand. PlanPal will still allow you to add expenses even when no budget is set / budget is negative. This is intentional since you can be in a deficit in real life. - Add expenses using the
addcommand. - View the list when needed using the
listcommand. - Exit the mode using the
exitcommand.
IMPORTANT NOTE
There are 2 additional tags you need to take note of.
By default, the program assumes that you are working the current month and also NOT on the recurring list.
Adding these tags to any of your commands in this mode does the following:
/recurring:- Tells the program to work on the recurring list of expenses. Does not support for budget.
- It will only add items in the recurring expense list if ALL the following conditions are fulfilled:
- A NEW list is being created
- The month of the new list is NOT before the current month.
/month::- Tells the program to work on that month’s properties (budgets and expenses).
- The format should be
/month: <monthValue>
Setting a Budget
The budget command allows users to add a budget.
By default, without the month being specified, it will assume that the month is the current month.
IMPORTANT NOTE
- You CANNOT use
/recurringtag for this function. - You CANNOT use multiple
/month:tags!
Usage:
budget <value>
budget <value> <month>
budget <month> </> <value>
Example:
budget 1000
budget 1000 /month: 2024-11
budget /month:2024-11 /1000
Expected Output:
_________________________________________________________
For the month of 2024-11
Budget has been set to: $1000.0
_________________________________________________________
Adding an expense
The add command allows users to add an expense to the expense list.
By default, without any tags the following is assumed:
- Month is the current month
- It is NOT a recurring expense.
Currently, the fields that can be used are as follows:
| Field | Constraints |
|---|---|
| name | Name is set to null by default |
| cost | Cost is set to $0 by default |
| type | Type is set to OTHER by default Only these values are allowed: - FOOD - TRANSPORTATION - ENTERTAINMENT - OTHER |
IMPORTANT NOTE
- Even if budget is not set, you can still add expenses.
- You can have negative budget since you are allowed to go into deficit.
- You should NOT use both
/recurringand/month:tags together. - if
/month:tags are used together (which should not happen), the last month is prioritised
Usage 1 (default addition without tags):
add /<field 1>: <value 1> /<field 2>: <value 2> /<field 3>: <value 3>...
Example:
add /name: Lunch /cost: 10 /type: food
Expected Output:
_________________________________________________________
Added successfully!
_________________________________________________________
Currently in list:
1. [Name = Lunch, Cost = $10, Type = FOOD]
_________________________________________________________
Usage 2 (with recurring tag):
add /recurring /<field 1>: <value 1> /<field 2>: <value 2> ...
Example:
add /recurring /name: Spotify /cost: 10.90 /type: entertainment
Expected Output:
_________________________________________________________
Added successfully!
_________________________________________________________
Currently in list:
1. [Name = Spotify, Cost = $10.90, Type = ENTERTAINMENT]
_________________________________________________________
Usage 3 (with month tag):
add /month: <monthValue> /<field 1>: <value 1> /<field 2>: <value 2> ...
Example:
add /month: 2024-11 /name: Spotify /cost: 10.90 /type: entertainment
Expected Output:
_________________________________________________________
Added successfully!
_________________________________________________________
Currently in list:
1. [Name = Lunch, Cost = $10, Type = FOOD]
2. [Name = Spotify, Cost = $10.90, Type = ENTERTAINMENT]
_________________________________________________________
Viewing an expense list
The list command allows users to view their expense list.
By default, without any tags the following is assumed:
- Month is the current month
- It should NOT look for the recurring expense list.
Viewing list also shows the user’s spending information:
- Spending proportion of that month for each expense type
- Total amount of money spent in a given month for each expense type
IMPORTANT NOTE
- You should not use both
/recurringand/month:tags together. - if used together,
/recurringtag is prioritised
Usage 1 (default addition without tags):
list
Example:
list
Expected Output:
_________________________________________________________
Below is the list:
1. [Name = lunch, Cost = $10, Type = FOOD]
2. [Name = gift, Cost = $20, Type = OTHER]
3. [Name = grab, Cost = $15, Type = TRANSPORTATION]
4. [Name = train, Cost = $8, Type = TRANSPORTATION]
5. [Name = cake, Cost = $15, Type = FOOD]
_________________________________________________________
For the month of 2024-11
    Total budget: $1000.0
    Total cost: $68.0
    Remaining budget: $932.0
_________________________________________________________
Expense Type Proportions:
    FOOD: 36.76%
    OTHER: 29.41%
    TRANSPORTATION: 33.82%
_________________________________________________________
Expense Type Cost Breakdown:
    FOOD: $25.00
    OTHER: $20.00
    TRANSPORTATION: $23.00
_________________________________________________________
Usage 2 (with recurring tag):
list /recurring
Example:
list /recurring
Expected Output:
_________________________________________________________
Below is the list:
1. [Name = lunch, Cost = $10, Type = FOOD]
2. [Name = gift, Cost = $20, Type = OTHER]
3. [Name = grab, Cost = $15, Type = TRANSPORTATION]
4. [Name = train, Cost = $8, Type = TRANSPORTATION]
5. [Name = cake, Cost = $15, Type = FOOD]
_________________________________________________________
Usage 3 (with month tag):
list /month: <monthValue>
Example:
list /month: 2024-12
Expected Output:
_________________________________________________________
Below is the list:
1. [Name = car rental, Cost = $80, Type = TRANSPORTATION]
2. [Name = dinner, Cost = $20, Type = FOOD]
3. [Name = movie, Cost = $10, Type = ENTERTAINMENT]
4. [Name = concert, Cost = $20, Type = ENTERTAINMENT]
_________________________________________________________
For the month of 2024-12
    Total budget: $900.0
    Total cost: $130.0
    Remaining budget: $770.0
_________________________________________________________
Expense Type Proportions:
    TRANSPORTATION: 61.54%
    FOOD: 15.38%
    ENTERTAINMENT: 23.08%
_________________________________________________________
Expense Type Cost Breakdown:
    TRANSPORTATION: $80.00
    FOOD: $20.00
    ENTERTAINMENT: $30.00
_________________________________________________________
Editing an Expense
The edit command allows users to edit their expense list.
By default, without any tags the following is assumed:
- Month is the current month
- It should NOT look for the recurring expense list.
IMPORTANT NOTE
- You should not use multiple
/recurringand/month:tags together. - if used together,
/recurringtag is prioritised - if
/month:tag is used together, the first month is prioritised
Usage 1 (default addition without tags):
edit <index> </field:> <value> ...
Example:
edit 1 /name: Dinner /cost: 20
Expected Output:
_________________________________________________________
Edited successfully!
_________________________________________________________
Currently in list:
1. [Name = Dinner, Cost = $20, Type = FOOD]
2. [Name = Spotify, Cost = $10.90, Type = ENTERTAINMENT]
_________________________________________________________
Usage 2 (with recurring tag):
edit <index> </recurring> </field:> <value> ...
Example:
edit 1 /recurring /name: Netflix /cost: 18.70
Expected Output:
_________________________________________________________
Edited successfully!
_________________________________________________________
Currently in list:
1. [Name = Netflix, Cost = $18.70, Type = ENTERTAINMENT]
_________________________________________________________
Usage 3 (with month tag):
edit <index> </month:> <monthValue> </field:> <value> ...
Example:
edit 1 /month: 2024-11 /name: Breakfast /cost: 5.40
Expected Output:
_________________________________________________________
Edited successfully!
_________________________________________________________
Currently in list:
1. [Name = Breakfast, Cost = $5.40, Type = FOOD]
2. [Name = Spotify, Cost = $10.90, Type = ENTERTAINMENT]
_________________________________________________________
Deleting an Expense
The delete command allows users to delete an expense from the expense list and displays the remaining expenses for that month.
By default, without any tags the following is assumed:
- Month is the current month (e.g. if today’s date is 1 November 2024, the current month is 2024-11)
- A “/month:” field in a previous command does not affect the current delete command.
- It should NOT look for the recurring expense list.
IMPORTANT NOTE
- You should not use multiple
/recurringand/month:tags together.
Usage 1 (default deletion without tags):
delete <index>
Example:
delete 1
Expected Output:
_________________________________________________________
Deleted successfully!
_________________________________________________________
Currently in list:
Usage 2 (with recurring tag):
edit <index> </recurring>
Example:
delete 1 /recurring
Expected Output:
_________________________________________________________
Deleted successfully!
_________________________________________________________
Currently in list:
Usage 3 (with month tag):
delete <index> </month:> <monthValue>
Example:
delete 1 /month:2024-05
Expected Output:
_________________________________________________________
Deleted successfully!
_________________________________________________________
Currently in list:
Finding an Expense
The find command allows users to find an expense from the expense list based on any of the fields.
By default, without any tags the following is assumed:
- Month is the current month (e.g. if today’s date is 1 November 2024, the current month is 2024-11)
- A “/month:” field in a previous command does not affect the current find command.
- It should NOT look for the recurring expense list.
IMPORTANT NOTE
- You should not use multiple
/recurringand/month:tags together. - if used together,
/recurringtag is prioritised - if
/month:tag is used together, the first month is prioritised -
Usage 1 (default finding without tags):
find <query>Example 1 (searching by name):
find dinnerExpected Output:
_________________________________________________________
Here is what I found:
1. [Name = tues dinner, Cost = $7, Type = FOOD]
2. [Name = wed dinner, Cost = $6, Type = FOOD]
_________________________________________________________
Example 2 (searching by cost):
find 7Expected Output:
_________________________________________________________
Here is what I found:
1. [Name = tues dinner, Cost = $7, Type = FOOD]
2. [Name = wed lunch, Cost = $7, Type = FOOD]
_________________________________________________________
Example 3 (searching by type):
find transportationExpected Output:
_________________________________________________________
Here is what I found:
1. [Name = grab, Cost = $10, Type = TRANSPORTATION]
2. [Name = MRT, Cost = $2, Type = TRANSPORTATION]
_________________________________________________________
Usage 2 (with recurring tag):
find <query> </recurring>Example:
find spotify /recurringExpected Output:
_________________________________________________________
Here is what I found:
1. [Name = Spotify, Cost = $10.90, Type = ENTERTAINMENT]
_________________________________________________________
Usage 3 (with month tag):
find <query> </month:> <monthValue>Example:
find lunch /month:2024-05Expected Output:
_________________________________________________________
Here is what I found:
1. [Name = lunch, Cost = $5, Type = FOOD]
_________________________________________________________
Activity Manager
PlanPal will assist you in tracking your activities in your planner. The guide below will show you how to make use of
the activity manager commands.
Adding an activity
The add command allows users to add an activity to the activities list.
If only the name of the activity is specified, the type of the activity will be set to others by default.
Usage:
add /name: <name> /type: <type>
Example 1:
add /name: running /type: exercise
Expected Output:
_________________________________________________________
Added successfully!
_________________________________________________________
Currently in list:
1. [activity = running, type = exercise]
_________________________________________________________
Example 2:
add /name: sleep
Expected Output:
_________________________________________________________
Added successfully!
_________________________________________________________
Currently in list:
1. [activity = running, type = exercise]
2. [activity = sleep, type = others]
_________________________________________________________
Viewing the Activities list
The list command allows users to view all their current activities.
Usage:
list
Expected Output:
_________________________________________________________
Below is the list:
1. [activity: running, type: exercise]
2. [activity: swimming, type: exercise]
3. [activity: groceries, type: necessities]
_________________________________________________________
Finding an activity
The find command allows users to find activities from the list. User can search of multiple words at a time and the input is not case-sensitive.
Usage:
find <value>
Example 1:
find exercise
Expected Output:
_________________________________________________________
Here is what I found:
1. [activity = running, type = exercise]
2. [activity = swimming, type = exercise]
_________________________________________________________
Editing an activity
The edit command allows users to edit an activity from the list.
Usage:
edit <index> /<category 1>: <value 1> /<category 2>: <value 2> ...
Example 1
edit 1 /name: diving
Expected Output:
_________________________________________________________
Currently in list:
1. [activity = diving, type = exercise]
2. [activity = swimming, type = exercise]
3. [activity = groceries, type = necessities]
_________________________________________________________
Deleting an Activity
The delete command allows users to delete an existing activity from the list, with
reference to its index in the list.
Usage:
delete <index>
Example 1:
delete 2
Expected Output:
_________________________________________________________
Deleted successfully!
_________________________________________________________
Currently in list:
1. [activity = running, type = exercise]
2. [activity = groceries, type = necessities]
_________________________________________________________
Auxiliary Commands
The commands below are not the main features of the 3 modes. However, they will make it more convenient for you when using the PlanPal application
IMPORTANT NOTE
The commands below ONLY WORKS in the following screens of PlanPal:
Main MenuCONTACT_MANAGEREXPENSE_MANAGERACTIVITY_MANAGER
Backing Up Files
The /b/ command is able to store all your current files into a back-up folder in the event that you corrupted your data. This folder is also encrypted to ensure that your files are secured.
IMPORTANT NOTE
- This function is not automated! Users have to use the command to create the back-up manually.
- The constraint given for this project is to have data files that can be manipulated.
- In no way are we going against this since the data is being loaded from files that can be edited.
Usage:
/b/
Restoring Back-up Files
The /r/ command restores your data files to the state of the previously saved back-up files.
Usage:
/r/
“Clearing” Screen
The clear command can be used to simulate the clearing of the screen. It is done by printing multiple blank lines. This would help to reduce the clutter on your screen if you wish to do so.
Usage:
clear
Exiting Modes
The exit command can be used to switch between different modes.
Usage:
exit
Leaving the Application
The bye command can be used to shut down the program when you no longer need it.
Usage:
bye
Command Summary
Auxiliary Commands
| Description | Command |
|---|---|
| Back Up Files | /b/ |
| Restore Files | /r/ |
| Clear Screen | clear |
| Exit Mode | exit |
| Leave Application | bye |
Contact Manager
Main Contact Manager Mode
| Description | Command | Example |
|---|---|---|
| Adding a contact | add /name: <name> /type: <type> |
add /name: PlanPal /phone: 12345678 /email: PlanPal@gmail.com |
| Deleting a contact | delete <index> |
delete 1 |
| Viewing the contact list | list |
list |
| Finding an activity | find <value> |
find Plan |
| Editing a contact | edit <index> /<field 1>: <value 1> /<field 2>: <value 2> ... |
edit 1 /name: PlanPal_v1.0 /email: PlanPal_v1@gmail.com |
| Search contacts by category | search <category> |
search friend |
| Setting contact category | category |
category |
Inside Category Mode of Contact Manager
| Description | Command | Example |
|---|---|---|
| Adding category | add <category> |
add friend |
| Removing category | remove <category> |
remove friend |
| Edit contact category | edit <contact index> <category 1>/<category 2>/... |
edit 1 friend/family |
| Deleting contact category | edit <contact index> |
edit 1 |
| Viewing category list | view |
view |
| Viewing the contact list | list |
list |
| Printing category functions | help |
help |
| Quiting setting category mode | quit |
quit |
Expense Manager
| Description | Command | Example |
|---|---|---|
| Setting a Budget (default) | budget <value> |
budget 1000 |
| Setting a Budget (with /month: tag) |
- budget <value> <month> - budget <month> </> <value> |
- budget 1000 /month: 2024-11- budget /month:2024-11 /1000 |
| Adding an Expense (default) | add /<field 1>: <value 1> ... |
add /name: Lunch /cost: 10 |
| Adding an Expense (with /recurring tag) |
add /recurring /<field 1>: <value 1> ... |
add /recurring /name: Spotify /cost: 10 |
| Adding an Expense (with /month: tag) |
add /month: <monthValue> /<field 1>: <value 1> ... |
add /month: 2024-11 /name: Spotify /cost: 10 |
| Viewing an Expense (default) | list |
list |
| Viewing an Expense (with /recurring tag) |
list /recurring |
list /recurring |
| Viewing an Expense (with /month: tag) |
list </month:> <monthValue> |
list /month: 2024-11 |
| Editing an Expense (default) | edit <index> </field:> <value> ... |
edit 1 /name: Dinner /cost: 20 |
| Editing an Expense (with /recurring tag) |
edit <index> </recurring> </field:> <value> ... |
edit 1 /recurring /name: Netflix /cost: 18.70 |
| Editing an Expense (with /month: tag) |
edit <index> </month:> <monthValue> </field:> <value> ... |
edit 1 /month: 2024-11 /name: Breakfast /cost: 5.40 |
| Deleting an Expense (default) | delete <index> |
delete 1 |
| Deleting an Expense (with /recurring tag) |
delete <index> </recurring> |
delete 1 /recurring |
| Deleting an Expense (with /month: tag) |
delete <index> </month:> <monthValue> |
delete 1 /month:2024-05 |
| Finding an Expense (default) | find query> |
find dinner |
| Finding an Expense (with /recurring tag) |
find query> </recurring> |
find spotify /recurring |
| Finding an Expense (with /month: tag) |
find <query> </month:> <monthValue> |
find lunch /month:2024-05 |
Activity Manager
| Description | Command | Example |
|---|---|---|
| Adding an activity | add /name: <name> /type: <type> |
add /name: running /type: exercise |
| Adding an activity with just its name | add /name: <name> |
add /name: sleep |
| Viewing the activity list | list |
list |
| Finding an activity | find <value> |
find exercise |
| Editing an activity | edit <index> /<category 1>: <value 1> /<category 2>: <value 2> ... |
edit 1 /name: diving |
| Deleting an activity | delete <index> |
delete 4 |